Wednesday, December 22, 2010

12/20/2010 - Whole Wheat Bread

I was interested to see what I would get from this formula. I'm open to the idea of whole wheat. I know it's healthier, I just don't know if it's as yummy. This formula calls for high-protein whole-wheat flour. I substituted the plain normal flour you can buy at the grocery store. That's also what I used in the sponge in place of the "coarse whole-wheat flour or other coarsely ground whole grains" called for. Maybe in the future I'll try pumpernickel rye flour or rolled oats there instead, but this time I wanted to keep it plain.

This formula makes use of both a soaker of whole-wheat flour and water, and a poolish of whole-wheat flour, water or milk, and yeast. The soaker sits on the counter all night, the poolish ferments there a couple of hours and then goes in the fridge until morning. I opted to use milk in an attempt to get the tenderest loaf I could. The next morning I stirred together flour, salt, and yeast, and then mixed in the poolish, soaker, honey, oil, and egg. The oil and egg were optional, but again I wanted the tenderest loaf possible. I kneaded the dough and left it to rise for two hours. Then I shaped and panned two loaves and proofed them for another hour and a half before baking.

I was quite pleased with the results. This was pretty good, for whole-wheat bread. It was soft enough for sandwiches, and had just the right touch of sweetness. When I asked J4 what he would say if I told him that this was the only bread I was going to make from now on because it's healthier, he said, "You're fired." It's not that he didn't like it. He liked it fine, for whole-wheat bread. I think this could be a sometimes bread at our house. But I don't think we could ever make the switch to all whole grains. It can be yummy. But not all the time.

12/17/2010 - Artos: Greek Celebration Bread

'Tis the season for christopsomos. Greek celebration breads, which fall under the general name of artos, are pretty similar in ingredients, but differ in shaping and tradition. BBA gives one formula for the dough, and then suggests christopsomos and lambropsomo as two variations of artos. Christopsomos, the traditional Christmas bread, features dried fruits that are red (I used dried cranberries) in addition to dark and golden raisins and walnuts, while the Easter lambropsomo features golden raisins, dried apricots, and slivered almonds. The breads are also shaped differently: christopsomos is a round loaf overlaid with a cross, while lambropsomo is a braided loaf with dyed, hard cooked eggs nestled in it.

This formula calls for barm or poolish. I haven't restarted a sourdough barm since my last one died. I have some in my freezer that I plan to get out in the near future, but that can wait until after Christmas. For now, I just made up the poolish, let it ferment for a few hours, and stuck it in the fridge overnight. Much easier than worrying about sourdough! The next morning, I stirred together the flour, salt, yeast, cinnamon, nutmeg, allspice, and cloves (this sounds good already, doesn't it?). Then I mixed in the poolish, orange zest, almond extract, eggs, honey, olive oil, and milk (ok, how about now?). I added the dark and golden raisins, dried cranberries, and chopped walnuts during the kneading, and then left the dough to rise for about an hour and a half. I turned out the dough onto the counter and put a third of it in a ziplock bag in the fridge. I shaped the remaining dough into a boule and placed it on a sheet pan to proof for another hour and half or so. Then I removed the dough from the fridge, split it in two, and rolled each portion into a snake. I laid these over the loaf on the sheet pan in a cross, split the ends, and coiled them. Then I baked the loaf for about 45 minutes. While it baked, I mixed up a glaze of water, sugar, honey, and lemon extract in a saucepan, which I brushed over the loaf immediately after removing it from the oven.

I was excited to shape this fancy loaf, but I must admit that I had no high hopes when it came to flavor or texture. I expected this to be a lot like panettone and stollen. Once I started kneading it, though, I became more interested. As you would expect, it was a very aromatic dough, and a pleasure to work with. And when it baked, my whole house smelled fabulous. We were very pleasantly surprised with this bread. In addition to being beautiful, it was flavorful and delicious, and very soft in texture. This is definitely my favorite of the fruit breads in BBA. There are just two things I would like to work on. First, most of the coiled ends of my cross uncoiled; clearly I need to pinch them to seal better next time. Second, the glaze stayed runny and sticky for a long time; I think next time I'll try using less water and see where that gets me.
      

Tuesday, December 7, 2010

Try, try again

 As I near the end of this project, I'm trying to revisit some of the formulas that didn't go so well for me the first time. Two that I've done in the past week are English muffins and ciabatta. I think my mistake with both of these was the same: too much flour added to yield too stiff of dough. I think my second attempts at both were vast improvements, but neither of them were quite there yet.

The formula for English muffins calls for 3/4 to 1 cup of milk. This time, I made sure to add the full cup of milk, and I resisted the urge to add flour during the kneading stage. The dough was pretty tacky, but still very workable. The muffins still didn't really spread on the griddle the way PR says they should. Also, we felt that they were a little large and filling. Next time I think I will make 8 muffins instead of 6 and take care to flatten them a little more when I shape them.

The formula for ciabatta calls for 6 Tbsp to 3/4 cup of water, so again I added the maximum amount. As I mixed the dough, I added another 1/4 cup of water to get it to the consistency I thought I wanted. I was much happier with the way the dough felt as I worked with it, and much more pleased with the oven spring this time around. The finished product still didn't have the large holes you look for in ciabatta bread, but it was closer. If anything, I felt like the dough could have been wetter as I worked it, and next time I think I'll add even more water.

12/2/2010 - Vienna Bread

According to Peter Reinhart, Vienna was at one time the center of the bread universe and the true origin of many of the French breads we love today. This formula for Vienna bread is like a French or Italian bread formula with a few enrichments added; my take is that it's sort of a cross between French or Italian bread and white sandwich bread. Included with this formula is a grace note about Dutch crunch topping. This is a yeasted, slightly sweet paste that is brushed on the bread before baking to leave a crunchy coating on the top crust. It can be applied to any bread; PR suggests it for this formula, so I gave it a try.

This formula makes use of a preferment called pâte fermentée, which I made up the evening before and kept in the fridge overnight. The formula calls for 2 1/3 cups of preferment and the formula for the preferment makes 3 cups; I went ahead and used all 3 cups of preferment. In the morning I mixed my dry ingredients while the pâte fermentée warmed on the countertop. I added it and the wet ingredients, mixed and kneaded my dough, and left it to rise for two hours. It doubled during that time, so I kneaded it lightly to degas and returned it to the bowl to double a second time. I divided my dough in half, shaped two loaves, and set them on a sheet pan to proof for an hour or so. Then I mixed up the Dutch crunch paste and left it to ferment while the bread proofed. While the oven preheated, I brushed my Dutch crunch topping on the loaves. There was a lot of topping; I decided to use it all, so it was spread pretty thick. I baked the loaves hearth style for about 30 minutes and then set them on a rack to cool.


I quite liked this bread; it makes a nice, slightly fancier stand-in for normal sandwich bread. The crunchy topping was fun and added a slight sweetness. We especially enjoyed this one toasted. I think in the future I will try halving the recipe for the Dutch crunch paste. While it wasn't bad the way it was, the bread definitely didn't need that much.   

Wednesday, November 24, 2010

11/20/2010 - Cranberry-Walnut Celebration Bread

Just the thing for Thanksgiving! I've been saving this one and the anticipation has been building. I love the flavor and loyalty (that "yum" that stays in your mouth after you're finished eating) that walnuts bring to bread, and how can you go wrong with dried cranberries?

This is a relatively quick bread to make. I stirred together the sugar, flour, salt, and yeast, and then mixed in orange extract, eggs, milk, butter, and water. Then I kneaded a few minutes, added a pile of dried cranberries almost as big as the dough itself, kneaded a few more minutes, added the chopped walnuts, and continued kneading until everything was evenly incorporated. I let the dough rise for about two hours until it had doubled, and then I shaped it into a double braid. I divided the dough into three portions, and then stuck two portions back together. I divided that larger bulk of dough into three equal pieces, rolled them out like snakes, braided them, and placed them on my baking sheet. I did the same with the smaller portion of dough, and then I placed the small braid on top of the large one, pressing it down slightly. I brushed the loaf with an egg wash and left it to proof, uncovered, for an hour and a half. Then I baked the loaf at a fairly low temperature for about an hour.

This was a great bread. It looked fabulous, it tasted fabulous. We spread it with raspberry jam and a smidge of horseradish and sandwiched leftover chicken breast and provolone inside. The only way it could have been better is if it had been leftover cranberry sauce in place of the jam and turkey in place of the chicken. Next year this will be my Black Friday bread.

11/23/2010 - Poolish Baguettes


True to its name, this formula begins with a preferment called a poolish. I mixed flour, water, and a little yeast to make what looked like a thick pancake batter. I left it at room temperature to ferment for four hours and then put it in the fridge overnight. The next morning, I looked at the formula and realized I only needed one cup of poolish; I had followed the poolish formula and made about three cups. Rather than toss perfectly good preferment, I decided to make a double batch of baguettes using all the poolish and just add a little less water.

This formula calls for 1 3/4 cups sifted whole wheat flour. I don't have a fine sieve, so I followed the note on the side of the page and used 2 Tbsp unsifted whole wheat flour, substituting regular bread flour for the rest (but since I doubled it, it was 4 Tbsp). I mixed the dry ingredients and added the poolish and water; then I remembered that it's a dumb idea to use my smaller mixing bowl when I'm doubling a formula. But of course once one mixing bowl is dirty there is no way I'm going to transfer my half-mixed dough to the bigger one and dirty another dish. So I carefully mixed my dough and kneaded it, and left it to rise for two hours. After that first rise I kneaded it for a minute and left it to double again for two hours, as instructed. Then I shaped my baguettes. This formula normally makes three small baguettes; I made four large ones. They proofed for about an hour, then I preheated the over for hearth baking and scored them. These baked for about 20 minutes and came out quite beautifully.

The baguettes were soft and flavorful. J4 thought they would be perfect for sub sandwiches, but we never got around to trying it out. I think I did a much better job on these than I have in the past with French or Italian bread.

Monday, November 15, 2010

11/15/2010 - Multigrain Bread Extraordinaire

It seems like I saved all the easy one day formulas for the end, doesn't it? Here's another one that was ready by lunchtime.

This formula utilizes a soaker to tenderize several of the grains that grace this bread. Coarse cornmeal (I used the plain normal grind), rolled oats, and wheat bran (I substituted whole wheat flour . . . it has some bran, right?) are soaked in water at room temperature overnight. I left my soaker out overnight and in the morning I mixed up the flour, brown sugar, salt, and yeast. I added the soaker, some cooked brown rice, honey, warm milk, and water to make the dough. I kneaded it and left it to rise until it doubled. I shaped and panned my loaf, let it proof about an hour, and baked it 50 minutes or so.

This is a fabulous sandwich bread. I really enjoyed its light sweetness and soft, moist texture. This formula makes a two-pound loaf and I only have 1 1/2 pound bread pans, so my pan was a little overfilled, but it worked ok. Not awesome, but ok enough that I would do it again. This one could become a standby.

11/11/2010 - Casatiello

Casatiello is a rich Italian bread packed with cheese and bits of meat. Yum! J4 has been looking forward to this formula and picked up a block of provolone at the store last week to hurry me along. I used summer sausage for the meat since that's what I had in the house, but according to BBA salami is the preferred addition.

This is a quick one day formula that was ready in time for lunch. I mixed some bread flour, yeast, and warm milk to make the sponge, which foamed for about an hour. Meanwhile I diced up that summer sausage and lightly sautéed it, and J4 grated the provolone. To make the dough, I stirred together the remaining flour, salt, and sugar, and then mixed in the sponge and a couple of eggs. Next a good amount of butter is worked in, followed by the meat and finally the cheese. The dough was soft and very tacky; even dusting with flour frequently, it was a bit of a challenge to get everything evenly distributed without leaving half of the dough stuck to the counter. I let the dough rise to almost double, shaped and panned two loaves, proofed them, and baked them. My house smelled heavenly.

This bread was excellent. It was flaky and rich, but not sickeningly so like brioche. We loved the meat and cheese in it, although next time I'd like to plan ahead and get some salami. We passes along a loaf to friends and got rave reviews from them as well. This one's a keeper!

Monday, November 8, 2010

11/6/2010 - Marbled Rye

Unlike most of the rye formulas in this book, this bread is made in one day without any sourdough barm. Easy. You just have to make two doughs instead of one. The light and dark rye doughs are identical except that the dark includes a coloring agent. I used cocoa to darken mine. I actually used 50% more cocoa than the formula called for, and I would still have liked it to be a little darker. I suspect that the only way to get the rich dark rye that I'm looking for is with liquid caramel coloring, but I don't have any of that sitting around my kitchen.

I mixed and kneaded my doughs, first the light and then the dark. This dough incorporates a bit of molasses, and that smell still makes my skin crawl a little. The doughs rose for about an hour and a half, and then I divided them each into six equal portions for shaping. I flattened three light and three dark portions into rectangles and alternately layered them; I then rolled them up and sealed the crease to make a spiral loaf. I divided the remaining three light and three dark portions in half, and then squashed them together to form a marbled loaf. I panned my loaves, let them proof for another hour and a half, brushed them with an egg wash, and baked them.  

These loaves were just plain fun. The flavor was good (although J4 was disappointed that I didn't add caraway seeds), but I really just enjoyed the fun patterns in the bread. I just wish my dark rye had been darker.

11/2/2010 - Portuguese Sweet Bread

Before BBA, I always thought of this bread as Hawaiian bread, but PR says that Hawaiians give credit for it to the Portuguese. This bread is made in one day, and is enriched with powdered milk, butter, shortening, and eggs, and flavored with sugar and extracts of lemon, orange, and vanilla.

This bread is begun as a sponge of flour, sugar, yeast, and water that ferments and foams for about an hour. To make the dough, you actually cream together the enrichments first, and then add in the sponge and bread flour. I've never creamed ingredients to make a bread dough before; usually butter is added near the end when the dough is mostly formed and the gluten has begun developing, since too much fat tends to get in the way of that important process. I think the sponge in this formula allows some gluten development to occur prior to the mixing of the dough. I kneaded the soft dough and set it in a bowl to rise for about 2 hours. Then I divided the dough in two, shaped the pieces into rounds, and placed them in pie pans. They proofed for a full 3 hours, and then I brushed them with an egg wash and baked them for about an hour.

I don't think my loaves ended up rising quite to the size they were meant to, even though I allowed them plenty of time. They didn't really fill the pie pans. However, the texture of the bread was very good and not at all dense. The flavor was excellent as well, and we really enjoyed sandwiches on this bread. It also made fabulous French toast. 

Monday, November 1, 2010

10/30/2010 - Stollen

What better time to make stollen than for a Reformation Day Germanfest potluck? I have to admit that I wasn't too excited to bake stollen after being so disappointed with my panettone.

The evening before baking, I tossed my dried fruit mixture (golden raisins, dried cherries, and snipped dried apples) with white rum and orange extract. The next morning I mixed up the dough, rich with butter, egg, and milk and flavored with orange zest and cinnamon. I added the fruit mixture and kneaded it well, and then set it in a bowl to rise. I really enjoyed the shaping of this bread. The dough is lightly flattened into a rectangle, sprinkled with sliced almonds, and then flattened more in the middle with a rolling pin. It is then folded over itself a couple of times with more almonds sprinkled in the folds, pressed together, and curled into a crescent. After proofing and baking, the bread is brushed with oil and heavily dusted with powdered sugar. The finished loaves are quite dramatic.

I am still not a lover of fruit bread, but we all enjoyed stollen more than panettone. It was a bit dry for our taste, but just judging from the notes alongside the formula I think it is supposed to be that way.
  

10/28/2010 - Sunflower Seed Rye

Sunflower seed rye concludes my foray into sourdough breads, at least for the time being. I probably wouldn't have quit on them so quickly, but in baking this bread I determined that my sourdough barm is definitely no longer able to raise bread. It still gives the sourdough flavor, but I suspect I have a barm colonized with plenty of bacteria and lacking a healthy yeast population. I do have some barm in the freezer, and I may try again with that sometime in the near future. I have a lot of pumpernickel flour left, and there's not much to do with it that doesn't involve sourdough.

The day before baking this bread, I made the soaker by combining some pumpernickel flour with water and leaving them at room temperature overnight. I also made a firm sourdough starter by combining some barm with flour and a little water. This was supposed to rise to at least double, but mine didn't rise at all. After five hours or so I gave up on it and put it in the fridge. Lucky for me, this bread is spiked with commercial yeast so it would still work. The next day I mixed the dough, kneaded in the sunflower seeds, and let it rise to double. I then shaped two couronnes from my dough and let them proof on a baking sheet. I then baked my loaves hearth style, and they turned out beautifully.

We enjoyed this bread. It's definitely a rye that I would make again, someday when I resurrect my sourdough barm.

Tuesday, October 26, 2010

10/22/2010 - Pain de Campagne

I took a break from sourdough and made something completely different. This bread is made with standard bread flour with a little bit of whole wheat flour mixed in. Peter Reinhart suggests creatively shaping this dough, and I was excited to try shaping an épi, or sheaf of wheat.

This dough is made using a batch of pâte fermentée ("old dough"), a firm pre-ferment that is made the day before and refrigerated overnight. The pâte fermentée actually makes up just over half the total volume of the dough. I mixed and kneaded mine, and let it rise. Then I turned it out onto the counter and divided it into three equal portions. I shaped these into long, thin baguettes and let them proof on the baking sheet. I did the final shaping while the oven preheated. An épi is shaped using a kitchen scissors, and it was actually very easy to do. Starting at the top, you make deep cuts almost all the way through the baguette at a diagonal to the baking sheet. Then you fan the cut pieces of dough out to either side as you move down the baguette. This bread is baked hearth-style, and mine baked pretty fast because of the shaping.

I loved how these turned out. The épi makes for a very elegant presentation, and it's a neat way to make pull-apart rolls. The flavor and texture were both very good, and I liked the touch of whole-wheat. One thing I didn't like was the dullness of the crust. This is generally how my hearth breads tend to look, and I think it really detracts from their quality. A couple of days after making this bread I made a batch of kaiser rolls. I tried lightly misting them with spray oil immediately after removing them from the oven, and I was very happy with the results. They weren't greasy at all, just a little softer and more pleasant to look at and to eat. Although they are made with steam, kaiser rolls aren't a hearth bread; I think I may give the spray oil a try on the next hearth bread I make and see what happens.

Monday, October 25, 2010

10/18/2010 - Poilâne-Style Miche

The brief introduction to the Parisian baker Lionel Poilâne that prefaces this formula illustrates one of the reasons that I find bread so rewarding, so worth making. Peter Reinhart calls Lionel Poilâne the most famous bread baker in the world, and he elucidates what it is about Poilâne's method that makes this so - his understanding of fermentation, his commitment to using the finest ingredients, the careful training he gives the bakers working under him. After reading this excerpt, it is striking to note the ingredients that make up a Poilâne-style loaf: whole-wheat flour, water, and a little salt. No yeast is even required, as this bread relies on wild yeast for leavening. From these few ingredients, bread can be made in the style of the most famous bread baker in the world. Before I was a mommy, I was a biologist. I was trained in reductionism. I was taught to assume that a complex system was equal to the sum of its parts. If you understand the parts, you understand the whole. Now, this assumption may be a necessary one in the laboratory, but it seems to me that the best and most real parts of life completely contradict a reductionist viewpoint. What I love about making bread is that you get so much more out of it than you put in. Whole wheat flour, water, salt. From the simplest of ingredients is fashioned a living dough that, when handled properly, may yield a world-famous product.

Now that I've waxed poetic, I will tell you that I did not actually make this bread correctly. I think I must have left my sourdough barm on the counter too long after I refreshed it, because when I made the firm starter for this bread, it never really achieved a full rise. It should have doubled within 4-6 hours. After 7 hours mine still hadn't doubled but I went ahead and put it in the refrigerator. The next morning when I made the final dough, I spiked it with a little commercial yeast to make up for my sluggish sourdough barm. I figured it was better to cheat a little than to have a flat loaf of bread. This formula makes a large batch of dough and it was a bit of a challenge to work with, but still doable. I kneaded it and let it rise for several hours. Then I formed one large ball and placed it in my biggest bowl to proof. After an hour and a half of proofing, I turned it out onto a baking sheet, scored it, and baked it hearth style. I've kind of gotten away from using my stone just because it's easier to bake bread on the baking sheet. And this loaf was so heavy I didn't really care to try to transfer it from sheet to stone and back again.

This loaf was very large and impressive (so large it baked for over an hour!). The flavor was good, but it was a little dense for my taste. I think that may just be the nature of 100% whole wheat bread. I also found the crust to be too hard. The hardness of the crust combined with the large size of the loaf made slicing it a little difficult. However, my two-year-old loved it. J4 actually used it to bribe him into eating eggplant. If that endorsement doesn't make it world-famous, I don't know what will.
 

Friday, October 15, 2010

10/14/2010 - Pumpernickel Bread

Yes, I have officially made the bread with the coolest name. This bread is begun the day before baking with a rye starter composed of sourdough barm, pumpernickel-grind rye flour, and water. The barm acidifies the rye flour, activating enzymes for flavor and improving digestibility. My starter fermented at room temperature for almost six hours and then went in the refrigerator overnight. The next day I combined it with the remaining ingredients to form the dough. Pumpernickel bread has a couple of unique ingredients. One is cocoa powder, which is added for color but also affects the flavor. The other is rye bread crumbs. Since we didn't particularly care for the 100% sourdough rye bread, I have a good supply of rye bread crumbs in my freezer that fit the bill. After mixing and briefly kneading my dough (briefly since rye doughs become gummy with too much kneading), I left it to rise for two hours. I then divided it in two and shaped and panned my loaves. I'm not actually sure how long they proofed, although I am sure it was much longer than they were supposed to. I baked them as instructed and didn't notice any ill effects of the extended proofing.

We enjoyed this bread. I think it is my favorite rye, although we did like the New York Deli Rye as well. How much we enjoyed this bread may be due to the way we enjoyed it - if you're going to bake pumpernickel bread, how can you not make Reubens? Yum!

10/11/2010 - Panettone

Although it is not listed with the sourdough breads, panettone is made with a wild-yeast sponge of barm, milk, and flour. The formula calls for a cup each of golden raisins and a candied fruit blend, but PR notes that dried fruit may be substituted as well. I opted to make my own blend of dried apples, cranberries, and cherries to add with the raisins.
The day before baking, I made the wild-yeast sponge mentioned above and let it ferment at room temperature for four hours before refrigerating it overnight. I also combined my dried fruit and soaked it overnight with lemon and vanilla extracts and half a cup of white rum. Then next day, I mixed the dough. This is an enriched dough, with butter, egg, and sugar. It is partially mixed and then allowed to rest for 20 minutes so that the gluten can begin to develop before the butter and fruit mixture are added. During kneading, a cup of almonds are added as well. My dough rose slowly, as is normal for a dough rich in butter, and then I divided it into two balls and placed them in parchment lined cake pans. These proofed for two hours, and then were baked for an hour and a half at 325 - the lowest temperature at which I have ever baked bread.

I was excited to try this bread. I've never been a big fan a fruit bread, but lots of yummy things went into this and I just knew that it HAD to be better than fruit breads I have had before. But it turned out a lot like other fruit breads. I mean, it was good for a fruit bread, but it was definitely still in that category. We ate about half of one loaf and were kind of done. There is a grace note following this formula with instructions for making Holiday Bread Brûlé - basically fancy bread pudding, using panettone. I scooped out the insides of my loaves, mixed up the custard base, poured it over the scooped bread, and baked it at 325 for an hour. I skipped the part about letting it cool and then sprinkling it with sugar and caramelizing it under the broiler, but I'm sure that's lovely too. We ate it just plain, and it was very good. The best bread pudding I've ever had, in fact. J4 doesn't normally like "soggy bread dishes," but he liked this one, and J5 thought it was cake.

10/9/2010 - Potato, Cheddar, and Chive Torpedos

If we didn't find the cheese bread we were looking for in the roasted onion and asiago miche, we found it here. This is another mixed method bread, incorporating sourdough barm and spiked with commercial yeast, and it is a quick and easy one day formula.

I chopped and boiled a couple of potatoes, and set out a cup and a half of barm to warm to room temperature. I reserved the potato water, since it is used for the water in this formula. An hour later, I began mixing the dough. For this formula, half of the flour, the yeast, potatoes, and half of the water are mixed and then left uncovered for 30 minutes. Then the remaining water and salt are added. Chopped fresh chives are added during kneading, and then the dough is left to rise. Once my dough was doubled, I divided it in two and flattened each piece into a rectangle. I laid slices of cheddar cheese on the dough and then rolled it up, jelly-roll style, and laid the loaves on a sheet pan. They proofed for about an hour and then I scored them and baked them hearth style.

This bread was excellent. It gives me a good reason to keep a sourdough barm in my fridge. And I am becoming much more comfortable with the barm, so I find that idea less daunting. I would change two things next time. First, I think I will mash the potatoes rather than leaving them in chunks. Second, I want to try to have the cheese reach further into the ends of the bread.

Tuesday, October 5, 2010

10/2/2010 - Roasted Onion and Asiago Miche

I'm trying to get smart about this sourdough thing and make two breads back to back when I refresh my barm. There is a three day window in which the barm is good after it is refreshed, and since some formulas take two or three days to make, they are pretty easy to stagger their starting day in that window so that they'll be baked a couple days apart.

This bread is made using a mixed leavening method, which means that it is leavened with wild yeast in the sourdough barm and spiked with commercial yeast as well. On the first day of the three day process, I added flour and water to some of my sourdough barm to make a sponge, which fermented on the counter all day and then sat in the fridge overnight. I also chopped and oven roasted an onion, which made my house smell fabulous. The next day I started by chopping up some fresh chives and scallions. Now, J4 and I both grew up calling scallions "green onions", and I must confess that we inadvertently both did google searches to make sure that they were indeed one and the same. He was at work, I was at home, we had a phone conversation afterwards, it was a little ridiculous. But now that we know they are the same, we are henceforth calling them "scallions," which we believe to be the snobbier of the two terms. Anyway, I mixed my dough with gobs of lovely, fresh, fragrant green in it, and it was so pretty that I took a picture.      
That dough also contains a cup and a half of asiago cheese, but it is far less noticeable. I kneaded the dough, let it rise, shaped two large rounds, and put them on a baking sheet in the refrigerator overnight. In the morning they were pretty huge and touching. I proofed them at room temperature for two hours and they were even more huge and touching. Then came the fun part. Following PR's instructions, I brushed the loaves with olive oil and then pressed my fingertips into the dough, making deep dimples all over its surface. I sprinkled another cup and a half of cheese over the loaves, and then topped them with the roasted onions. These were baked hearth style for 40 minutes, during which time they had sizable oven spring which left them even more huge and touching. About halfway through baking I separated them and they were fine. These came out of the oven with a whopping 11inch diameter. They looked like thick, pillowy pizzas.
This bread was yummy, but it wasn't what we expected. J4's comment? "I thought this would be cheese bread with onions in it, but it's onion bread with cheese in it." And that sums it up. We enjoyed it (and are still enjoying it), and it was fun to make. I'm guessing I probably won't make it again, but if I do, I think I will top the bread with the roasted onions first and then the cheese so that the onions don't get quite so done.

9/30/2010 - 100% Sourdough Rye Bread

Next on my list of sourdoughs: 100% sourdough rye. This is one that I was not excited to make. The description preceding the formula says that rye has so little gluten that it's hard to develop structure and lift for a pleasing crumb without adding wheat flour, and then goes on to say, "However, there are many people who love dense rye bread." I was pretty sure I wasn't going to be one of those people. When I say that a bread is "dense," I don't mean it as a compliment.

This formula can take two or three days; I made it in two. The first day, I mixed the firm rye starter, combining some of my refreshed sourdough barm with rye flour and water. I should note that I used my regular sourdough barm, made using wheat flour, so this technically isn't 100% rye bread. But it's close enough. This starter fermented at room temperature until doubled, which took close to 6 hours, and then was refrigerated overnight. While my starter was rising, I mixed up the soaker from equal parts pumpernickel-grind rye flour (which is a coarser grind than standard rye flour) and water. The soaker sat at room temperature overnight. The following day, I mixed the dough and briefly kneaded it. Apparently if you over-knead rye dough it gets gummy. I have no experience with this, but I'll take PR's word on it. I did not enjoy working with this dough. The lack of gluten gives it a completely different feel that that of normal yeasted bread. I let the dough rise to double, then shaped my two loaves and left them to proof. I baked them hearth style directly on the pan they proofed on.

As expected, I didn't care for this bread. It was dense. Also, I didn't like the flavor. I can't think of any redeeming qualities that can make up for bad flavor and texture. J4 and J5 both liked it, so I guess the flavor and texture weren't necessarily bad, just not to my liking. This is one that I'm checking off the list and never revisiting.

Tuesday, September 28, 2010

9/24/2010 - New York Deli Rye

This was the next bread in my sourdough run and my first rye bread. I added lightly sautéed onions to the preferment, which was optional, but I skipped the caraway seeds. J4 and I weren't sure if we knew what rye tasted like apart from the caraway flavor, and we wanted to find out. This bread smelled amazing as it baked. I think it was the onions that did it. I didn't really know what to think when I tasted it for the first time. I told J4 I didn't know if I could handle a bread with this much flavor. There was the tang of sourdough, the flavor of the onions, and the flavor of the rye itself. It took me a bit to get used to it, but J4 loved it from the start. The texture of this bread was very soft, and it stayed moist for days. While it was almost too flavorful to be eaten on its own (for my taste anyway), this bread made amazing sandwiches . . . and I guess that's what you're supposed to do with a deli rye anyway.

Thursday, September 23, 2010

9/21/2010 - Basic Sourdough, Take 2

I figured it was time to give sourdough another go. This time, it worked like a charm. I used pineapple juice for the first two days of building the seed culture, just like last time; and just like last time, on day 3 I saw evidence of bacterial activity but not yeast. I followed the instructions PR had blogged for remedying this problem and stirred the seed culture every few hours to keep it aerated. It took an extra day, but I eventually got the doubling I was looking for. I made my barm, which in turn foamed and bubbled after a few hours just like it was supposed to, popped it in the fridge, and used it for the starter of my bread the very next day. My starter doubled perfectly, and I put it in the fridge overnight. The next day, I mixed, kneaded, fermented, shaped, and proofed, and then stuck the the proofed loaves in the fridge to develop flavor over one more night. On the final day, I allowed the loaves to sit at room temperature for a few hours and then baked them, hearth style.

These turned out perfectly. It was very rewarding to complete the entire process and have everything work just right. The bread was good. J4 liked it more than I did; I think I may just not really care for sourdough. I can eat it and I don't mind it, but it's definitely not my favorite. My plan now is to keep my barm active and motor through all the other sourdough formulas and be done with it. Maybe by the end I'll like at least some variation of sourdough better and decide to keep making it, maybe not. Either way, I should be pretty comfortable with the process by the time I'm done. I did freeze half of my barm when I refreshed it to start on the next formula, and PR says it should be good frozen for 6 months, so I can always pull that out and defrost it if I feel the urge to revisit sourdoughs down the road. 

Wednesday, September 22, 2010

9/19/2010 - Pugliese

This bread is a good reminder of how thankful I am for PR's brief excerpts that preface his formulas in this book. The cultural and historical background he provides and the descriptions of how the bread should perform throughout the baking process are invaluable. I was immediately intimidated as I read through it the day before baking this one, because this is a rustic bread with a very wet dough, something I am inexperienced and not very comfortable with. When he likened it to ciabatta, I was a bit concerned but also somewhat excited at this opportunity to correct my mistakes.

This is another bread that starts as a biga which is cold fermented in the fridge overnight. This dough calls for fancy durum flour, which I do not have, but PR notes that you can substitute a smaller amount of semolina flour and make up the difference with bread flour, so I opted to go that direction. This dough also can include an optional 1/4 cup of mashed potatoes, and I went ahead and added that to make the bread more tender. The dough I ended up with was extremely wet, but I was heartened by the note in the formula that the wetter the dough, the better the bread will be, and I plunged ahead. This dough is too wet to be kneaded; instead, it is turned out onto a bed of flour, generously dusted with more flour on top, stretched and folded, allowed to rest, and stretched and folded again. This was the point at which I knew my ciabatta dough was too stiff, but this time around it seemed to fit perfectly with the descriptions and pictures in BBA. After the first rise, gently shaping, and proofing, I attempted to score the loaves, this time with an exacto knife with a fresh blade. It worked better than my previous attempts, but I need to work on it. I baked my loaves on the pan they proofed on to avoid all the transfer from countertop to stone. I'm not sure that it makes much difference if the bread is baked on the stone or not; I've been happy with it both ways. I'm sure it makes more difference with some breads than with others.

We really liked this bread. It was very tender and the flavor was excellent. And I have to say that I kind of liked working with the wetter, rustic dough. This is one I would like to make again.    

9/16/2010 - Italian Bread

The moral of this story is, "Don't rush the bread." And I knew that going in. But I really wanted to have it fresh out of the oven with soup for lunch. By the book, this bread should require 5-6 hours on the day of baking, but I figured that with my warm house I could make it work. 

This formula calls for a biga, a firm preferment that is made the night before and refrigerated. I got up at 6:15am when the alarm clock went off (the first time, no snoozing) and pulled the biga out of the fridge to warm up while I showered. Then I rushed back out to the kitchen to mix my dough. I barely glanced at the cookbook as I went, and that is where I made my big mistake. I read, "3 1/2 cups all purpose flour; 2 1/2 cups bread flour." PR occasionally calls for both types, and I always just use bread flour, so I dumped 6 cups of bread flour in my mixing bowl along with my biga, salt, yeast, sugar, and malt powder. I added the smidge of olive oil called for, and then did a double take when I got to the water. It only called for 3/4 cup. I knew that would be a ridiculously stiff dough. But that's what it said to do, so I did it. As I struggled to bring the dough together, wondering also why PR would specifically call for a 4qt mixing bowl for such a large batch of dough, I looked back over the entire formula. And this time I read, "3 1/2 cups biga; 2 1/2 cups bread flour." Ouch. 

Since I had basically doubled the flour, I decided to salvage my dough by doubling everything else, except of course the biga. I ended up with a dough that felt right and I went with it. After kneading, I left the dough to rise to double, but I kept a close eye on it and divided and shaped as early as I possibly could. Since my batch was doubled, I made two loaves and a batch of breadsticks. After proofing for about 45 minutes, I called it good and baked them all together, with the loaves on my stone on the bottom oven rack and the breadsticks on a pan on the top rack.

This is one more hearth bread in which I failed to achieve the open crumb I wanted. I handled it as gently as I could, but I think rushing both rises was a big mistake. The bread tasted good, and we enjoyed it, but J4 said that I have to do this one again since it had half the biga it was supposed to. One more thing to fix next time: I wish I had waited and baked the breadsticks separately. They were soft on the inside from the high baking temperature and hard on the outside from the steam used in hearth baking. We decided we would prefer them to either be crunchy or soft, not halfway between. But they looked fun.
     

Friday, September 17, 2010

9/11/2010 - Lavash Crackers

I had no idea when I was going to make this one, because it didn't seem like these crackers would fill any niche in our day to day diet, and I'm all about meal planning around the baking that I do. But we had a Mission Sunday at church with a potluck that was supposed to feature international foods. So I decided to bring the Middle East in addition to a Norwegian dessert.

I mixed and kneaded the dough, and I left it to rise. Then I misted the counter with oil, and rolled out the dough to the thickness I thought I wanted. I was a little skeptical about transferring the rolled-out dough to a parchment lined baking sheet, but it held together beautifully and didn't stick to the counter at all. Then I misted the surface of the dough with water and topped it with rows of sesame seeds, caraway seeds, and paprika. I cut the dough into diamonds with a pizza cutter and popped the baking sheet in the oven. PR says they should take 15-20 minutes to brown across the top. Mine took almost twice that long and they puffed up a little during the baking. I realized about halfway through baking them that I had probably made them way too thick, at least in the middle.

When I got them out and tried one of the ugly ones, I decided that, yes, I should have rolled them out thinner. The edges were the right thickness and delightfully crispy, but the centers were too thick and lacking that crispiness. They were still fine, and I still brought them. But these might be worth another shot.

9/10/2010 - Cinnamon Raisin Walnut Bread


This is a quick and easy bread that is made in one day. That was a little disappointing to me at first. I wanted it to be a dough that was refrigerated overnight so I could pull it out at 4:30am after M's nighttime feeding (yes, she's 7 months and still eating at 4am, but I'm ok with that), and bake it at 7am for yummy Saturday breakfast. The solution to this problem was to make the bread Friday evening so that it was a yummy Friday night bedtime snack AND a yummy Saturday breakfast.

I mixed and kneaded the dough and then quickly chopped my walnuts and measured and rinsed my raisins. The mounds of walnuts and raisins together looked to be equal to my volume of dough, and I wasn't sure how all of that goodness was going to go into that little ball of dough. But it did with some careful kneading. I set it in a bowl to rise and we put the kids to bed. Then I plopped down on the couch with J4 to watch Star Trek, the movie—the one about young Captain Kirk and Spock and time travel through black holes. I'm not a Trekkie, so I have no idea if that description actually differentiates this movie from any other Star Trek movie. The only other one I've ever seen is the one where Spock dies (he didn't die in this one, neither one of him). Once the dough had doubled, we paused the movie and I shaped my loaves by flattening the dough into rectangles, sprinkling liberally with cinnamon and sugar, rolling them up, and panning them. Then we watched another half an hour of so of movie before I preheated the oven and then dashed back to the kitchen again to pop them in. Fortunately, this was not a thinking movie. The loaves finished baking when we had about 15 minutes of movie left. PR instructs that these loaves should cool for at least an hour, preferably two hours, before being sliced. However, mine cooled for about 20 minutes.

This bread was perfect. It was excellent without any butter, and it made wonderful toast the next morning. The sweetness was just right, it's chock full of raisins, and I think the walnuts are what really made the flavor special. This is one that I need to remember to make again. And again, and again, and again.      

Tuesday, September 7, 2010

9/6/2010 - English Muffins

What better bread to make for a lazy Labor Day at home than English muffins? The formula was easy, and the muffins were ready in plenty of time for breakfast-for-lunch. I had fun making these. The dough is mixed, kneaded, raised, and shaped into buns for the final proofing. Then the muffins are cooked on a griddle for 5 minutes on each side, and then popped in the oven to finish baking. Easy, fun, yummy.

My English muffins weren't quite where I wanted them, and I think it was because my dough was too stiff. They didn't really spread on the griddle the way they were supposed to, so we ended up with very fat, dense, muffins. We still enjoyed them, but I'll be revisiting this one.
Even with thicker than desired English muffins, McDonald's has nothing on these.

Taking a "break"

Sort of. I went an entire week without crossing a single formula off my BBA list. That's not to say I didn't bake any of them, I just baked one I had made before. Specifically, I revisited potato rosemary bread, but with a slight variation. This past week I baked potato basil bread, and I made it twice. I was helping with the food at a baby shower this past weekend, and I decided to try out a recipe I've always been intrigued by but never had a good reason to make: the Big Sandwich. You take a round loaf of bread, slice it into five horizontal slices, and load it up with roast beef, turkey or ham, bacon, several types of cheese, onions, and tomatoes. You pop the whole thing in the oven to melt the cheese, slice it into wedges, and serve. Yum! I chose to use potato rosemary bread for its softness, but I wanted the flavor to be a bit milder so I substituted fresh chopped basil for the rosemary. It was perfect for this application. My sandwiches were only sliced into four horizontal slices because the loaves were on the small side, but they turned out beautifully and were delicious!  

Wednesday, September 1, 2010

8/28/2010 - Cinnamon Buns

Yum! I was excited about this one. This formula is one of the few in BBA that can be made in one day, but I opted to stretch it to two days so we could enjoy these for breakfast. This is a rich dough (though not nearly as rich as, say, brioche), and you actually begin by creaming together sugar, salt, and butter or shortening almost like you're making a cake. Once you mix in the remaining ingredients, it is clearly a bread dough, but a very soft one (or as PR describes it, "silky"). The dough is kneaded and rises to double its size. Then you roll it out into a rectangle, sprinkle it with cinnamon and sugar, roll it up into a log, slice it, and lay the slices on a sheet pan. At that point, I stuck my sheet pan in the fridge overnight. Well, kind of overnight; I actually set it back on the counter to warm back up and proof at 1am or so. That way, they were ready to bake when we got up in the morning. While they baked, I made the glaze and we all enjoyed the smell of baking cinnamon buns.

These were yummy, but I'll make some changes next time. First, I will use the full amount of cinnamon and sugar called for. It looked like way too much as I was sprinkling it over the rolled out dough so I probably stopped with almost half of my mix left, but this batch definitely needed more. Second, I will make fewer, thicker buns next time. I made 16 buns this time; next time I'll try 12. Finally, the lemon extract. The formula calls for lemon extract to be added to both the dough and the glaze. It didn't bother me in the dough, and I think I'll keep it there, but the glaze was so overpoweringly lemon flavored that it took away from the flavor of the buns. Next time I'm leaving that out completely. One thing I changed that I was happy about - I halved the recipe for the glaze (and yes, I put in half the lemon extract called for), and that made the perfect amount.

8/27/2010 - French Bread

French bread made according to the formula in BBA begins as a preferment called pate fermentee, which means "fermented dough" or "old dough". As with any preferment, the delayed fermentation of the pate fermentee allows the enzymes time to work on the dough while the yeast is dormant, improving flavor considerably. The formula for pate fermentee is almost identical to the list of ingredients that is added to it the next day to make the final dough - 1/4 cup more flour is added, but that's hardly any difference at all. So, you basically mix, knead, and rise half a recipe of French bread dough, put it in the fridge overnight, and then add the other half to it the next day. I've read that it's common for bakers to simply set aside a bit of dough from each batch to add to the next day's bread, which would make sense if you were baking French bread every day.

This bread had excellent flavor, but I was too rough with it in the shaping phase and it lacked the open crumb you want to see in French bread. This is an ongoing issue with my bread and something I need to continue working on. I attempted to score this bread, which is something I generally avoid for reasons you can see in the picture. I think I just need a better, sharper knife, or even a lame to really do it right.

Wednesday, August 25, 2010

8/21/2010 - Brioche

My mother has been telling me that this project is going to make us all fat because of the bad carbs. While I have no intention of jumping on the carbs-are-bad bandwagon, she may have a point when it comes to brioche. PR gives three variations on brioche: Poor Man's Brioche, Middle-Class Brioche, and Rich Man's Brioche, which vary by butter content. I had a hunch that I would probably never bake brioche again, so why not go whole hog and make Rich Man's Brioche? I hesitated because Rich Man's Brioche has an entire pound of butter to 4 cups of flour. But J4 said, "Won't you always wonder?" And he was right, I would. So I took the dive.

This formula begins with a sponge of flour, yeast, and milk. After that foams for 20 minutes, five eggs are whisked in, followed by the remaining flour, sugar, and salt. The resulting dough is allowed to rest for five minutes so the gluten can develop before it is overrun with fat. Then that pound of butter is worked in by quarters. Now, I don't own a stand mixer; I mix my bread by hand. This one was a challenge. J4 actually took a couple of turns mixing the give my arm a break, the wonderful man (which I thought was fitting at the time, as he's the wonderful man who talked me into an entire POUND of butter). We eventually got it all in and spread the very soft dough onto a parchment-lined baking sheet, which sat in the fridge overnight so that the dough could firm up for shaping. I don't own fancy fluted brioche molds (J4 wanted to get some, but I have to draw the line somewhere), so I just shaped my brioche as standard rolls and left them to proof for an hour and a half. Room temperature is pretty warm at my house in the summer, and that probably did nothing good for my brioche, which spread a bit more during proofing than I would have liked. I brushed them with an egg wash, stuck them in the oven, and came back ten minutes later intending to move them apart only to find that they had spread even further to basically fill the entire pan, so I just let them bake touching.

These were so ridiculously rich. It was amazing. Well, not that amazing when you know that there was between 1/4 and 1/3 stick of butter in each roll. They were yummy and flaky, but we couldn't handle much. We each had one and were done. Even though he's normally the first to gobble up the bread on his plate, J5 barely touched his; I guess in his 22 month-old wisdom he knew what wasn't good for him. So of course I ate his in addition to mine, although I really didn't want it. We decided we weren't ready to have all that richness again the next day, so now there is a bag of brioche rolls in the freezer that we will slowly work our way through. I'm pretty sure I'll never make this again, but I suppose it's nice to not have to wonder.

8/19/2010 - Cornbread

Cornbread is the only chemically leavened bread in BBA (the bread is leavened by baking powder and baking soda instead of by yeast). The fact that it was included at all in a book of yeast breads would suggest that PR is rather fond of it, and he says as much in the description preceding the formula. We like corn bread made the plain normal way, usually served with chili. I also really like to make it the way I remember my mother making it when I was little, with crumbled bacon and shredded cheddar cheese mixed in. We top it with syrup and eat it as a casual, comfort-food kind of dinner. So when I saw that PR tops his cornbread with bacon, I had a good feeling about it.

This formula begins with a cornmeal soaker, which is left at room temperature overnight. The formula calls for buttermilk, but I soaked my cornmeal in whole milk and called it good. Also, I used regular cornmeal instead of the coarsely ground cornmeal or polenta that PR calls for. The next day I fried up my bacon on my skillet; PR instructs to bake it in the oven, but I opted for the easy way. Mixing up the batter was pretty standard, but I could tell already that this formula was going to make a very sweet cornbread. I followed the formula and used the bacon fat to grease my cake pan, poured in the batter, sprinkled on the bacon, and popped it in the oven.

We were excited about this recipe, and we fully expected it to be the new cornbread that would replace my old one. But we were disappointed. First there was the texture. I think using the finely ground cornmeal was a mistake. The overnight soak definitely made a big difference to the texture, but not in a good way; I think a coarser grind of cornmeal would stand up better. Then there was the corn. I have thought about adding corn to my cornbread before, but I've never done it because I didn't think it would be good with syrup. Since this cornbread was so sweet, I wondered if we might be able to eat it on its own, avoiding the syrup issue. It was definitely sweet enough, but it seemed too dry without some gooey syrup soaked into it. Also, J4 missed having bacon pieces baked into the bread. We did enjoy the crispness of the bacon on top, and I think in the future I'll mix half in the batter and sprinkle half on top to get the best of both worlds. I think it may just be that we enjoy a particular cornbread experience that is something completely different from what PR prefers. And for the first time in this project, I think next time I'll stick to my old recipe.  

Thursday, August 19, 2010

8/18/2010 - Potato Rosemary Bread


This was an excellent bread to follow the colossal failure that was sourdough bread. Mashed potatoes add tenderness and flavor, and fresh rosemary adds, well, flavor.  This bread is made with a preferment called a biga, which I mixed, kneaded, and left to rise on the counter while brooding over my terrible sourdough bread. The biga sat in the fridge overnight, and then at room temperature for an hour the next day before being mixed in with the remaining ingredients.  I really enjoyed working with fresh rosemary.  It had never occurred to me prior to this that you could buy fresh rosemary at the grocery store (I did have to look at three different stores before I found it in stock, but that's another story).  My experience using fresh herbs has been limited to cilantro, which I have fresh in my kitchen maybe once a year, and a brief spree with mint when J4 and I discovered mojitos back in our childless studio-apartment-living days. I could not believe how strong the rosemary smelled and tasted.  It was just plain fun. Making this bread definitely fixed the idea of a future herb garden in the back of my mind.

We are really enjoying eating this one.  The rosemary makes this soft bread very flavorful, and brushing the loaves with olive oil before baking yields a pleasingly tender crust.  I'll probably be making it again this weekend so all that lovely leftover rosemary in my fridge doesn't go to waste.      

8/17/2010 - Basic Sourdough


This bread has been nothing but failure for me every step of the way. And when you are making sourdough bread there are a lot of steps. Sourdough bread is made by soaking flour with water at room temperature, which provides a growing medium for the wild yeast that is naturally present in your kitchen. You continue to add flour and water for several days until the dough rises, indicating that the yeast is working. This dough, called a starter, can then be kept in the refrigerator and refreshed whenever you wish to make sourdough bread. Along with the wild yeast, this starter is populated by various bacteria which produce the acids that give sourdough bread its distinctive flavor. A small amount of starter is used as the base for sourdough bread, providing both the sour flavor and the leavening power of the wild yeast.

Disclaimer: you probably have no interest in reading most of this. I'm writing it so that I can look back at it when I feel up to trying this again some day in the distant future. You probably want to skip down to the last paragraph or so and just read the part about how ridiculously bad this bread was. However, if you have made sourdough bread before and want to read the whole thing and tell me where my dumb mistakes are, that would be lovely.

I began my starter over a month ago. PR recommends using pineapple juice in place of water for the first two days of building the starter to prevent the growth of a particular strain of bacteria that can be problematic.  The acidity of the pineapple juice provides a pH that is good for the wild yeast and bad for this particular bacteria.  So on day 1 I mixed pineapple juice with flour, and on day 2 I added more pineapple juice and flour, as instructed. I was excited to see a slight rise on day 3, just as PR said there may be, and I discarded half of it and added water and more flour as directed.  On day 4, when the sponge was supposed to have doubled, I saw no rise.  PR said that was a possibility, and so I let it sit out for another day as instructed. But it still didn't rise. That day, day 5, I happened to be on the internet creating this blog when I stumbled upon the solution, blogged by PR himself. My starter had bacteria problems even in spite of the pineapple juice. So I aerated it as he instructed on his blog, and in the next day or so I saw the doubling I'd been looking for.  I scooped my finished starter into a couple of glass jars and stuck them in the back of my fridge.  I had been thinking and stressing about sourdough enough and I wanted to take a break from it for a couple of weeks. PR said the starter would be good in the fridge for at least 2 months, so no problem, right?

Last week, I pulled one of my jars of starter from the fridge and refreshed 1 cup of it with 4 cups of flour and 2 1/2 cups water, as instructed. I didn't get around to doing this until after supper, so I was a little alarmed when I realized it was supposed to sit at room temperature for 4-6 hours or until it was bubbly and foamy. Oops! When I was ready to go to bed, I took a look at it. It had bubbles on top; I wasn't really sure how foamy it was supposed to be, but I did know it was supposed to be refrigerated overnight, so I called it good and stuck it in the fridge. The next day, I measured out 2/3 cup of my refreshed starter, let it warm up on the counter for an hour, and added flour and a little water to make a dough. This was supposed to double in about 4 hours or so and then sit in the fridge overnight again. But it didn't double. In fact, it didn't rise at all. I left it out overnight, and it was the same size in the morning. So I threw it out, along with the refreshed starter.

I still had that second jar of old starter in the fridge, so this week I tried again. This time I made sure to allow enough time for my refreshed starter to bubble at room temperature. And again there were bubbles on the surface, but I was unsure about the foamy part. I decided to go ahead and use it, and I refrigerated it overnight. I made the next build of dough just as I had the week before, and again I saw no rise that day. Again I left it out overnight - might as well if I'm just going to throw it away, right? In the morning, I saw that it had doubled! Finally I was getting somewhere. I made the final dough that morning and left it to rise.  After 3-4 hours it hadn't doubled, so I left it longer. After about 7 hours I decided it had been long enough. It had risen some . . . maybe it had doubled, I wasn't sure. I turned it out onto the counter, where I divided it in two, shaped loaves as best I could, and placed them on a parchment lined sheet pan. The dough was a strange consistency. It almost had a gooey-ness to it and had definitely lost much of the firmness it had when I finished kneading it 7 hours earlier. I decided that at this point I decided that I was all in.  I was going to finish this bread and I was going to bake it.  I popped that sheet pan in the fridge to retard overnight because PR says that will allow develop maximum flavor, and I figured this one would need all the help it could get.  The next day, I let the sheet pan sit on the counter for 4 hours to bring my goo-dough to room temperature.  My "loaves" were basically thick, shapeless puddles on the sheet pan.

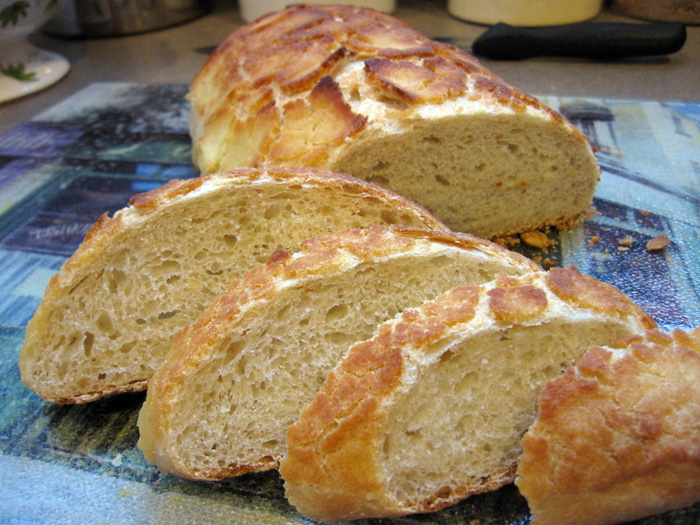
J4 pleaded with me to just throw them away, but I didn't come this far and burn though that much flour for nothing, so help me.  Those loaves were going to be baked. And baked they were. Amazingly enough, the loaves had a bit of oven spring, making them a tad less flat. The smell was right.  I transferred them from oven to stovetop to cooling rack, marveling at the somewhat bizarre coloration of their tops. When I sliced into the first loaf at dinnertime, I discovered the texture to be very wrong.  The crust was hard, which I would expect of a hearth bread, but the crumb inside almost had a gumminess to it.  The flavor seemed fine, but the texture made it pretty much inedible and definitely my greatest bread failure of all time.

It may take me awhile to want to hazard sourdough again. Unfortunately, eight formulas in BBA are leavened with a wild yeast starter, so I can only put it off for so long.                

Saturday, August 14, 2010

More bagels!


If I don't watch out, my family is going to expect fresh, hot bagels for breakfast every Saturday morning!  I've made a couple different variations, both of which we have enjoyed.  Peter Reinhart gives instructions for making cinnamon raisin bagels in BBA, so I gave those a shot last weekend.  And this morning I made asiago cheese bagels.  Both variations were excellent.  I did order some diastatic malt powder, and it seems to add that "bagel flavor" that we were missing before.  Unfortunately, I couldn't buy it locally so I had to buy an entire pound of it on Amazon.  I wish I had some local baking friends to share it with because I'm pretty sure it will take me years to use that much, even if I do keep making bagels every week!